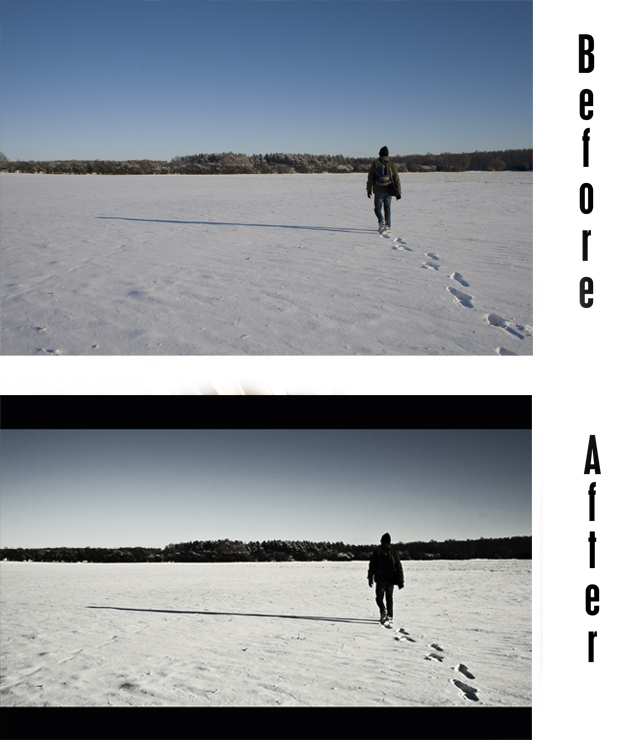
Donnerstag, 29. Januar 2009

Before/After "frozen lake" and "waiting for the light of day"

Due to the fact that it has been a long time since my last Before/After I decided to publish to at the same time to show you the most interesting ones of the last time in one post.

Frozen Lake


The first one is "frozen lake". It received the biggest feedback in the shortest time ever.
There were more than 100 faves at the first day and more than 500 views.
Some people also asked me for a before/after and this is why I post this one though I know that there decayed some time between posting the image and this post. I think there will be some visitors in the future who are happy to see what I did it from.


In my opinion the magic of this image lies in the misty trees in the background.
They give a depth to this image which wouldnt be there without them.
They were also the hardest part in postprocessing. It is not a big deal to convert an image into B/W but it is hard to get every single part of an image perfectly exposed and postprocessed. I used many different curves and masks to get every part right. At the end I was very happy with the result.

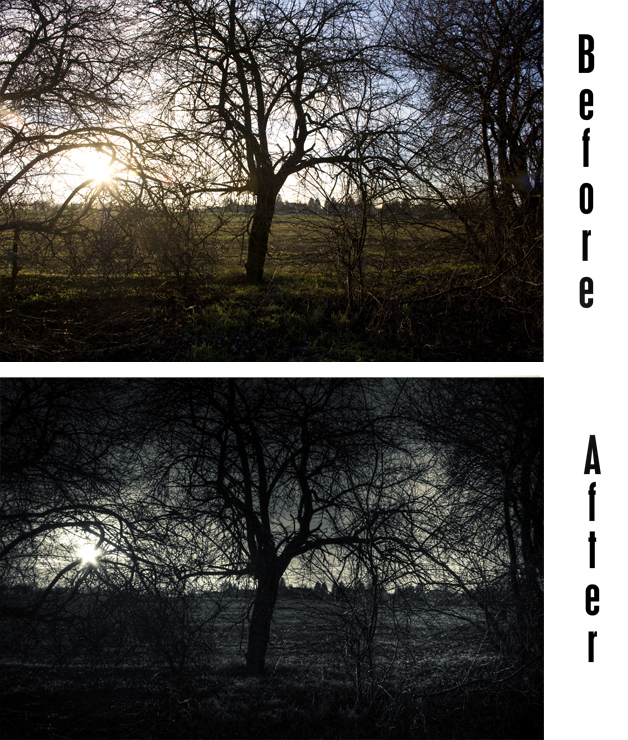
Waiting for the light of day


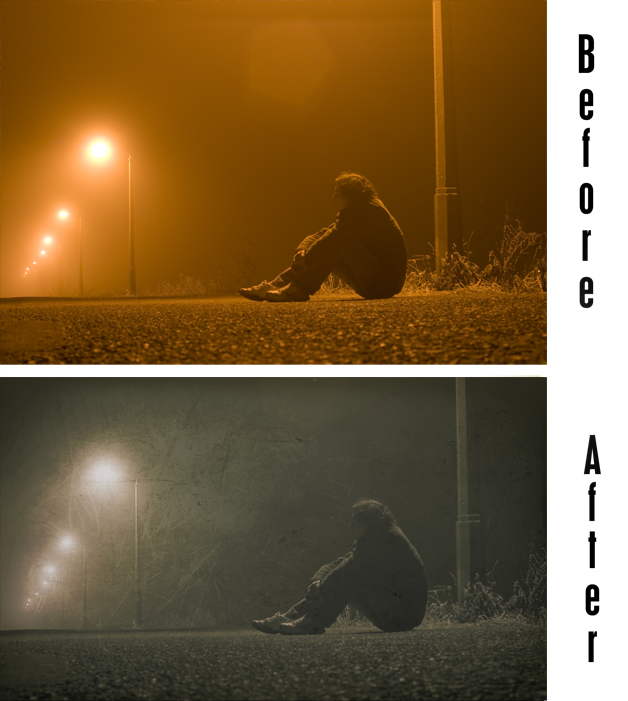
This is one other, very time-consuming postprocessing artwork.
I took this yesterday on my way back home. It was freezing cold so I tried to shoot as short as possible. This is why I only had about 15 shots from which I had to decide which one I want to use.
During the retouching I tried out many different tones, styles and colors but wasnt really convinced by one of them. After a hour I got this green style which I liked most. But the image wasnt really as good as I wanted it to be. What I did was adding a texture which brought the effect I hoped.
I think I will add these textures to the list of things that I try out when working on an image and maybe there will be some more texture works in my stream soon.

BTW: Does anyone of you have got experience with sites just like Imagekind? I would like to use something like that in the future but I am not sure which one is the best. please give me your personal experiences and opinions either as a comment here or a mail on flickr! Thanks in advance

Freitag, 23. Januar 2009

The HDR mastering tutorial

I am absolutely proud to present you this tutorial.
The following content has not been done by me but by my good friend d5e whom I came to know due flickr. We did many Urbex trips together in berlin and we help each other a lot with giving tips i.e. in photography or photoshop.
He has got a wide knowledge of the techniqual part of photography from the shooting itself to the postprocessing and there were many situations in in the past where he helped me with things I never heard before. This is why I give him the opportunity to write tutorials from time to time here on my blog. If I would to such a thing myself I fear it wouldnt be as helpful as his ones.

BTW: d5e's tutorials will always be signed with an overview of what is about to follow such as the following. This is how you can recognize them.
I hope you like it.

HDR tutorial splash

The video

If you want to take a look at the process of creating this HDR just click on the play-button.
We recommend to view it in large to see whats going on.

Final Version on flickr

About this tutorial

A lot of people mess around with HDR. And a lot more people think of extremely super contrast tone mapping artwork when thinking of HDR. In this tutorial I want to show you, that HDR photography is nothing special and easily to handle if you pay attention to the original photo and do not loose yourself or your photography in tone mapping extremism. Tone mapping is just a tool and as all tools it should be handled carefully. Its all about enhancing the quality of a photography, not destroying its sense.

Footnote

You need flash to play this video. Your browser has to support also iframes and javascript.

Take a look at the mastered version on flickr

This is a guest tutorial made by d5e. Visit my flickr stream.

Sonntag, 18. Januar 2009

Fisheye = Problems

Hey Guys,

I did not post for a week and just thought that the time is up for a new post.
As you can see from the title of this one I have got problems and need your help!

What is worrying me is my most recent purchase: a 0.45x Fisheye Conversion Lens that I bought on ebay.


I will explain this system for everybody who has never heard of this.
It is not a real lens that you can put on your camera body but an additional lens that you can screw on your existing lens to achieve a change in the focal distance.
In my story this should reduce my focal distance by the factor of 0.45 to reach a fisheye effect. I put it on my 18-55mm Canon lens and was disappointed from almost the first second on. The AF did not work at all and the manual one always showed a blurred image. I worked that out with the help of a friend of mine who told me that this lens doesnt only reduce the focal distance by the factor of 0.45 but the aperture too. So I manually set the aperture to f/22 and what I got were some sharper images. Despite that I am not happy with the results at all.

I uploaded the results on Flickr.

Click Here

I would really appreciate every opinion of you out there. Please watch the slide show of this set and then tell me what you think. Should I keep it? Or send it back?
It wasnt too expensive but I am really unsure whether I can live with these results.
The alternative would be a real Fisheye lens but these ones are definitely too expensive for me!

What should I do? Please help me!


BTW: I am looking for a 50mm f/1,4 or f/1.8 Lens that fits to my Canon EOS 400D at the moment so if you want to sell one please contact me. I am glad for every offer!


Thanks in advance for you help I am helpless without you!

greetings Ivo

Sonntag, 11. Januar 2009

Before/After "long walk home"


On the top of this post you can see the Before/After of my most recent shot "long walk home".
This is one of my favorites out of the snow shots I posted during the last week.
I like this especially because of the feelings of wideness and freedom, loneliness and coldness this radiates to me.

The day I shot this was the best one since the snow arrived.
It was cold, you were able to see your breath but it was one of the best shooting days ever. The sun was low so the shadows were endless. I really wanted to use this in one of my images. Actually I did it as you can see from the image on the top.
I needed about 5 tries to get the image I wanted (to be honest I hoped that one of these will be good because the sun was too bright to see just anything on the camera display).

The problem I had to solve was that I wanted to have an absolutely virgin snow surface so this scenery gets a wild and undetected look.
After the first try I realized that my own traces destroyed this because the second shot would show these foot steps and it wouldnt look like I would have walked in there for the first time (I hope this has been understandable).
I solved this by shifting the camera 2m to the left so that these old foot steps cannot be seen on the image.
For better understanding I show you how this looked like:


it worked out wonderfully and I had the shots I wanted.

Now about the postprocessing:

What can be seen easily is that I strongly strengthened the contrast of the whole image to underline the hard shadows and the contrast between the figure and the background.
I also overlayed an adjustment layer "solid color" filled with green-yellow and used the blending mode"luminosity".
I liked the result but now I had to think about the crop.
This image absolutely needed to lose space on the upper and bottom edge but I disliked the result when cropping it that way.
I tried these 16:9 blocks and loved the feeling of wideness it added to this image.

I hope you also like this piece of mine.

thanks again for all the views and comments here on my blog and on my flickr stream!

keep on clickin'!

Dienstag, 6. Januar 2009

Thanks

I am absolutely overwhelmed!
Today I reached the 1000 Viewers mark here on my Blog and this is the result of the first(!) month.
For me this is a very clear sign to go on and let you take a look behind the scenes further on.
My first post has been published on 3rd of December and I want to thank you all now, nearly a month after the first post, for your following and your helpful comments and mails on flickr.
I hope you are interested in more of my Before/Afters and the Stories behind the images
and you will also give me your feedback in the future.

Keep on clickin'!!

Ivory

Montag, 5. Januar 2009

Before/After winter tree


At first: Happy New Year to all of you!
I have been on the road the last days so I had no chance to post anything but I hope it will be more regularly from now on!
What you see on the top of this is post is the Before/After of my most recent artwork "winter tree".
I really like this one because of this dark feeling it has to me.
As you can see from the big difference of the Before and After images, this needed some postprocessing to look like it does now, but it has not been as much as you would probably think.

What I mainly did was enhancing the contrast of the whole image, adding grain, built a curve which shifted the single colors and finally created a layer "solid color" with an green-yellow tone which I overlayed using "color" and a low densitiy of 10%.

Thats it!
I finally cropped it a little and was fully convinced of the result.
What do you think?

I would really appreciate to read your opinion!


Due to the fact that it snowed here in berlin today I look forward to go shooting tomorrow for some snow pics.
You will see whether there came something good out of that if you follow my blog and flickr stream.

Keep on clickin'

Ivory